Integrations
Datto Autotask PSA

Connecting INFIMA to your Autotask PSA reduces the work on your accounting staff by automating monthly billing. Follow the steps below to complete the integration.
Overview
The integration creates an API User Account in Autotask that INFIMA services will use to update user status.
The following fields can all be modified in Autotask without impacting the integration:
- Descriptions
- Names
- Prices
- Costs
- All other fields for the Contract, Company, and Contract Service
Warning
Deleting the Service, Contract, or Contract Service will break the integration requiring it to be reimplemented.
Adding INFIMA to Autotask
The first step to integrating INFIMA with Autotask is to create the API User that INFIMA will use to make API calls to your Autotask instance.
Creating an API User Account
- Log in to your Autotask instance.
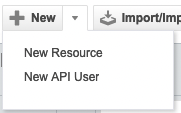
- Select Admin > Resources (Users) from the Navigation Panel.
- Select the drop down next to New to create a New API User.
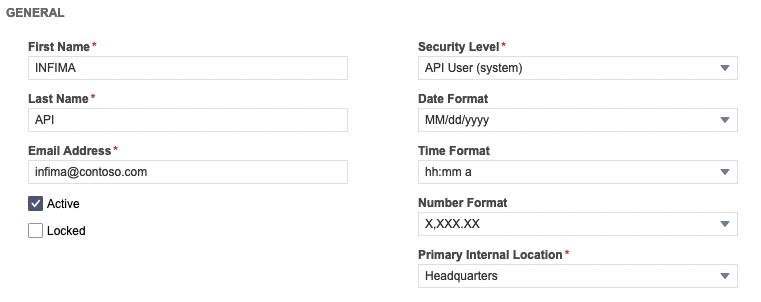
- Complete the General section of the form.
- Enter a First and Last Name. Ex: INFIMA API.
- Enter an Email Address. Ex: infima@contoso.com.
- Under Security Level, choose API User (system).
- Choose a Primary Internal Location from the available list.
- Under Credentials, Generate a Key and Secret. Store both of these values securely, you will need them for a later step.
- Under API Tracking Identifier, choose Integration Vendor. From the Integration Vendor drop down, select Infima - Security Training.
- Save & Close to create the user.
Validate Software as a Service Billing Code
Steps
- Navigate to Admin.
- Expand Finance, Accounting, & Invoicing. Click on Billing Codes.
- Select the Service Tab on the top menu.
- If Software as a Service is listed as a Billing Code you can skip the following steps. If not, you will create a new Billing Code:
- Click New.
- Under Name, type Software as a Service (case sensitive).
- Optional: Enter the account numbers required by your third party accounting software.
Complete your INFIMA - Autotask sync by adding the API User connection details into your INFIMA dashboard.
Configure in INFIMA Dashboard
Save Autotask Connection Details
Store the username and password details for the API User account that was created in Autotask.
- Log in to your INFIMA Dashboard.
- Select Partner Menu > Settings from the Navigation Panel.
- Under Integrations, select Datto Autotask.
- You will be prompted to enter your Username and Password. These values are from the API User you created in a previous step.
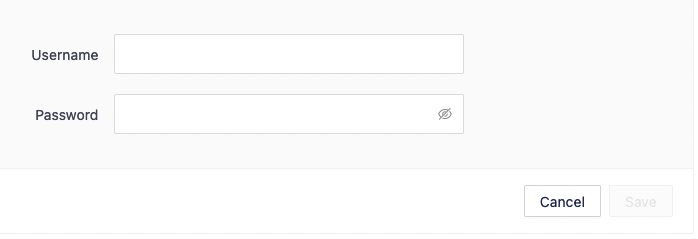
- Enter your Username and Password and click Save.
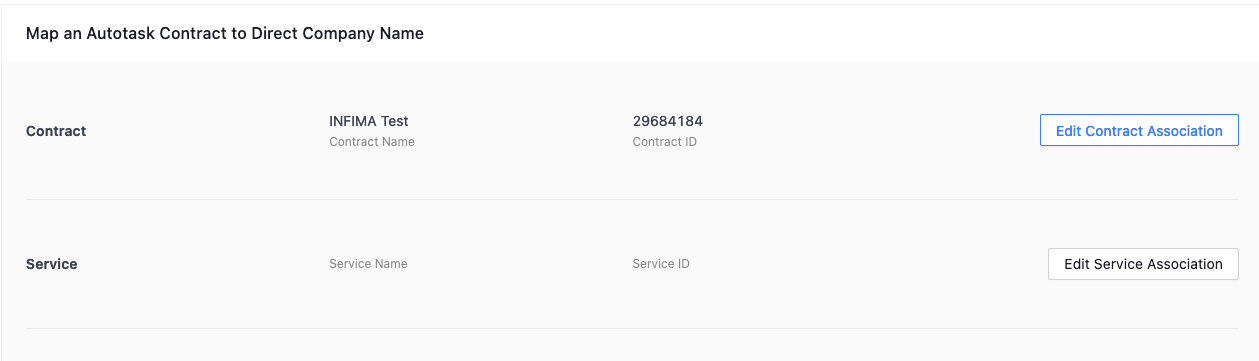
Map INFIMA Companies to Autotask Contracts
Warning
Before you can map a Contract and Service to an INFIMA client they must first be created in Autotask.
- Find the INFIMA Client you want to sync in the INFIMA Client Name column.

- Click the Plus "+" to create a Contract mapping for that client.
- Click Edit Contract Association to begin.
- Search for your Autotask Contract either by ID or Name.
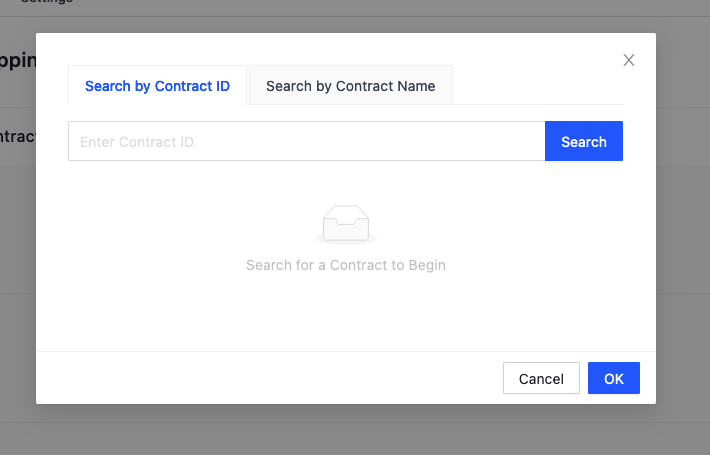
- Select your Autotask contract from the list. This will add the mapping and allow you to proceed to mapping the service.
- Click Edit Service Association to map a service in the contract.
- Search by a specific Contract Service ID or select a service from the full list for the contract that was chosen in step 5.
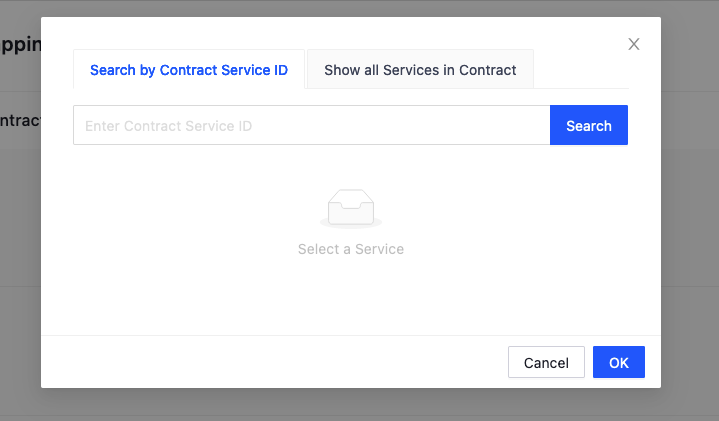
- Select your service from the list. This will add the service mapping and allow you to proceed.
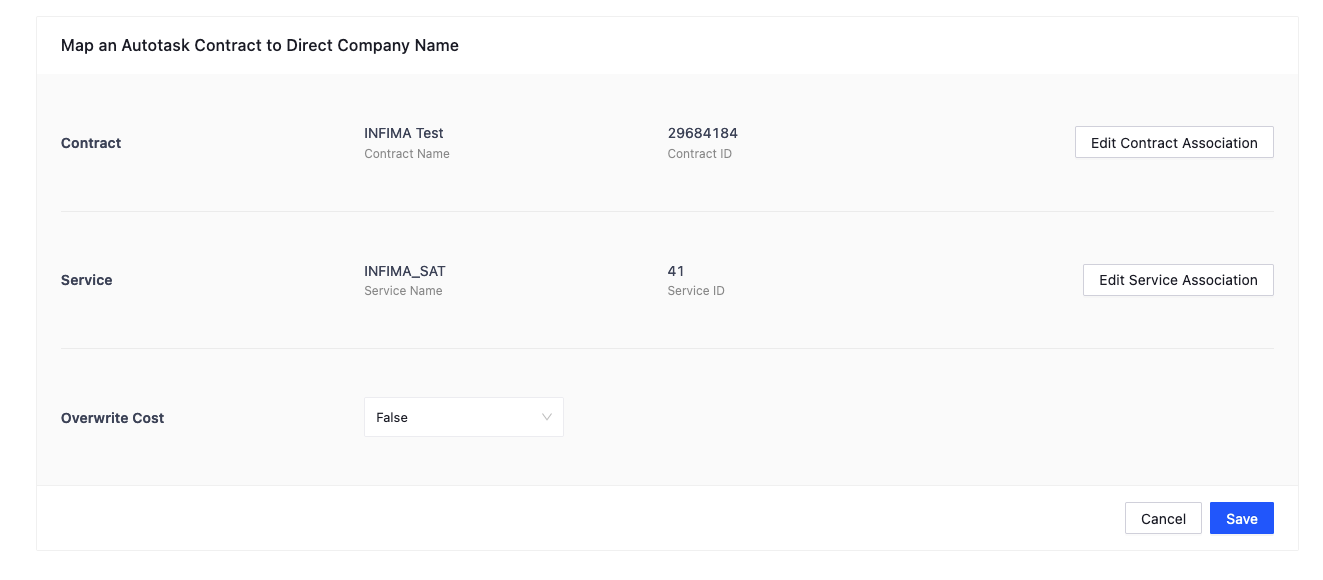
Implementation Note
If you set Overwrite Cost to true, when an update is performed the Unit Cost field on the Service will be updated to the current per user cost.
- Click Save to complete the mapping.

Success!
The service mapping is now complete. When billing is run on the first of each month the service will be updated to reflect proper user changes during the month.
Sync Considerations
Overwrite Cost
If this is enabled in the dashboard, when a monthly sync occurs, the unit cost value will also be updated.
Enabling Overwriting Cost
- In your INFIMA dashboard, click Edit for the client you want to enable overwriting cost.
- Under the column Overwrite Cost, select True from the drop down.
- Click Save.