Report Phishing button
The Report Phishing button is a one-click Outlook add-in your client’s users get in their inbox. When a user spots something suspicious — one of our phishing tests, an actual phishing attempt, anything they’re unsure about — they click the button, get an immediate confirmation that tells them what kind of email it was, and the report flows to both your security team’s mailbox and our system.
Microsoft 365 today — Google Workspace support is in development. The Microsoft 365 setup is everything below; we’ll publish the Google Workspace walkthrough once it ships.
You’ll need
Section titled “You’ll need”- Microsoft 365 admin access on the customer’s side — yours if you have it, theirs if you don’t. You’ll need it to upload the manifest in Microsoft 365 admin center.
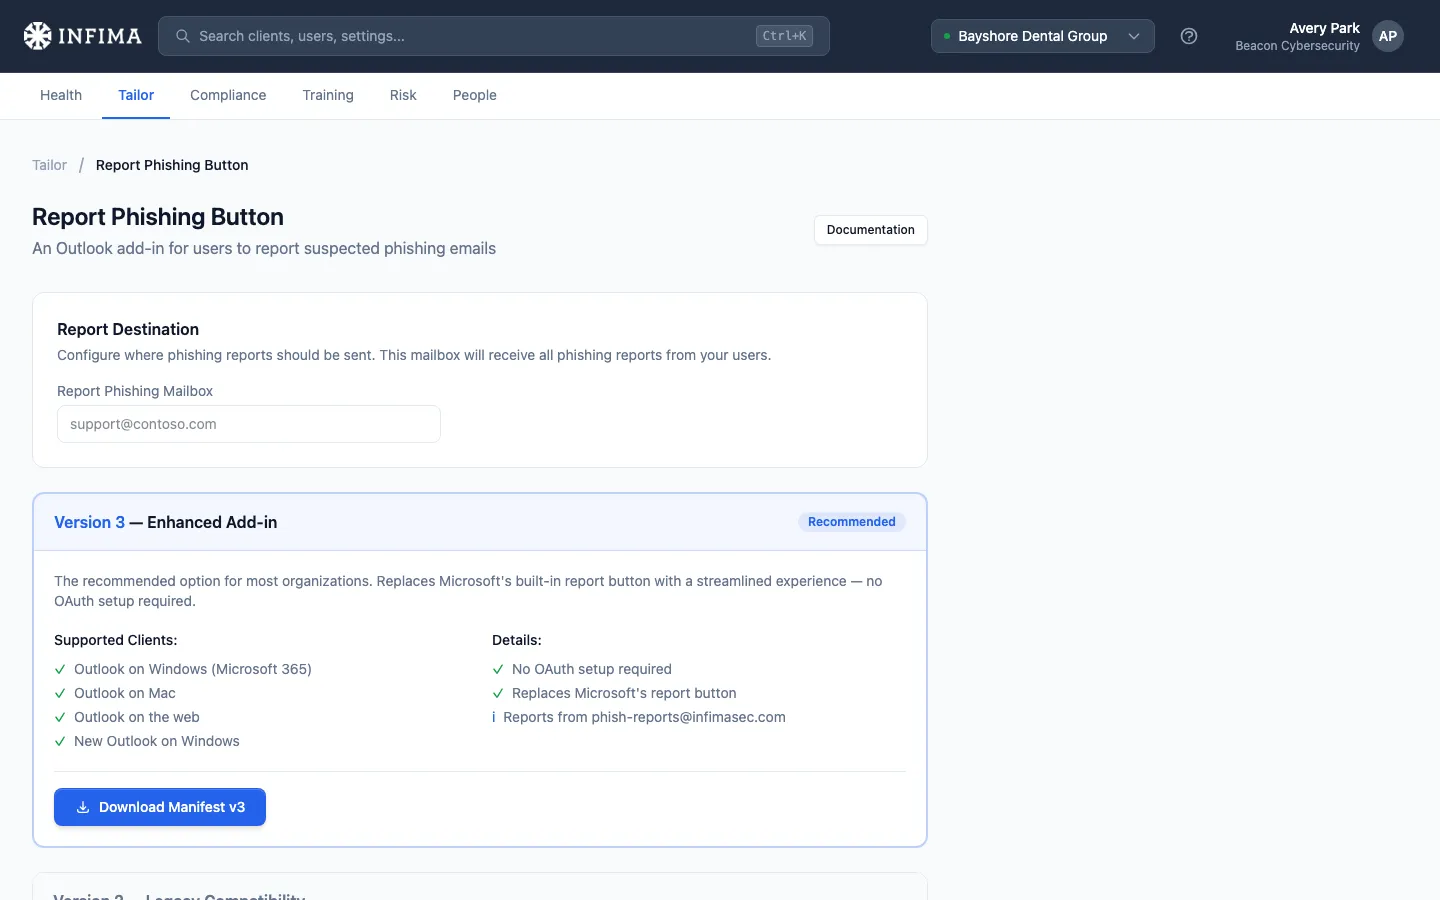
- A destination mailbox for the customer’s security team to receive phishing reports (a shared mailbox, a security distribution list, or wherever they want reports to land). Optional but strongly recommended.
Choose a version
Section titled “Choose a version”Two versions are available. Most new deployments should be v3.
Version 3 — recommended
- No OAuth approval required.
- Replaces Microsoft’s built-in “Report” button with our streamlined experience.
- Reports come from
phish-reports@infimasec.com(unified sender — easier email rules on the destination side). - Subject line format:
3| Suspected Phishing Email - <user email> - <timestamp>. The reporting user is still identified in the body and subject. - Supports modern Outlook clients only: Outlook on the web, New Outlook on Windows, Classic Outlook on Windows (build 17530.15000+), Outlook on Mac (16.81+ Preview). Mobile and older desktop versions come later.
Version 2 — legacy compatibility
- Requires a one-time OAuth approval step.
- Reports come from the user’s own email address (the reporting user is the sender).
- Adds support for iOS, Android, older Outlook desktop, and Microsoft 365 consumer accounts.
- Use this only when you have users on platforms v3 doesn’t support yet, or when you specifically need user-email attribution.
Walkthrough
Section titled “Walkthrough”Three actions in two places: configure the destination mailbox in our app, upload the manifest in Microsoft 365, and (v2 only) approve the OAuth scopes.
-
Configure the destination mailbox. Open the client → Tailor → Report Phishing Button. Enter the mailbox that should receive reports and save. The mailbox is technically optional but we strongly recommend setting one — without it the customer’s security team has nowhere to see real phishing reports.
-
Download the manifest. Click Download Manifest v3 (or v2 if you went legacy). That gives you an XML file.
-
Upload the manifest in Microsoft 365 admin center.
- Go to
https://admin.microsoft.com→ Settings → Integrated Apps. - Click Upload custom apps.
- Select Upload manifest file (.xml) from device and choose the file you just downloaded.
- Choose the deployment scope. Recommended: Entire organization so every user gets the button.
- Accept the permissions and finish the deployment.
- Wait up to 24 hours for Microsoft to propagate the add-in to users.
- Go to
-
(Version 2 only) Approve the OAuth scopes. Click Configure OAuth on our Tailor page, or visit
https://apps.infimasec.com/rpbdirectly, and complete the consent flow. v2 won’t work until this is done.
What the end user sees
Section titled “What the end user sees”The point of the button is the in-moment feedback the user gets when they click. That’s where the training happens.

Version 3 — single Report Phishing button on the Outlook ribbon or message actions, replacing Microsoft’s native report button. Clicking opens a clean confirmation dialog. Result depends on what they reported:
- A phishing test from us — educational feedback confirming the email was a simulated phishing test, with a brief teachable note. The user shows as Reported in our phishing activity — the success state.
- A real suspicious email — confirmation that the report was forwarded to the security team for review.
- A trusted / non-phishing email — validation that the email looks safe; the report is still recorded for visibility.
Version 2 — same outcomes, slightly different UX. The user selects Report Phishing from the mail dropdown menu; a panel opens prompting them to confirm; on submission they get the same three feedback variants (simulated campaign, real threat forwarded, trusted email).
The immediate-feedback message is what makes the button a training moment, not just a reporting mechanism. Users learn the difference between simulated and real phishing every time they use it.
You’ll know it worked when
Section titled “You’ll know it worked when”- Open Outlook as one of the customer’s users (or have them check). The Report Phishing button appears in the ribbon or message actions. Allow up to 24 hours after deployment for it to propagate.
- A test report from any user lands in the destination mailbox you configured.
- That same report appears in our system associated with the user. For a reported phishing test, the user’s status in Risk → Phishing for that test reads Reported.
Upgrading or removing the add-in
Section titled “Upgrading or removing the add-in”From v1 (legacy): Uninstall v1 in Microsoft 365 admin center, then follow the deployment steps for v2 or v3.
From v2 to v3: Uninstall v2, then deploy v3. Update any email filtering rules on the destination mailbox so they accept reports from phish-reports@infimasec.com rather than individual user addresses.
Remove entirely: In Microsoft 365 admin center → Settings → Integrated Apps, find the Report Phishing app, click it, then Remove app under the Actions header.
Frequently asked
Section titled “Frequently asked”Do I need to do this for every Microsoft 365 client? Yes — the mailbox configuration and the manifest deployment are both per-client because each customer has their own Microsoft 365 tenant. Once deployed, users see the button on their next Outlook restart (up to 24 hours).
My customer is on Google Workspace. What’s the equivalent? A Google Workspace version is in development. Until it ships, Google Workspace clients don’t have a Report Phishing button — users would need to forward suspicious mail to a security mailbox the customer’s IT team monitors directly.
A user reported one of our phishing tests. Does that count as “reported”? Yes — that’s the design. Reporting our test is the correct action and the user shows as Reported in the phishing activity. They also get the educational feedback message in the moment, which is the training payoff.
A user reported a real phishing email. What happens next? The report lands in the destination mailbox you configured (your security team investigates), and a copy comes to us so the activity shows in their phishing history. The user gets immediate confirmation the report was forwarded to the security team.
A user reported a legitimate email by mistake. Is that a problem? Not destructive — the report just sits in the destination mailbox with the “trusted email” feedback. The user is told the email looked safe; no further action is required.
Should I use v3 or v2? Use v3 unless you have a specific reason not to — older Outlook desktop versions that v3 doesn’t support yet, mobile users (v3 mobile is “coming soon”), or a deliberate need for user-email attribution on reports. Otherwise v3 is simpler (no OAuth) and the better long-term choice.
The reports are all coming from phish-reports@infimasec.com — how do we tell which user reported?
That’s v3 behavior. The reporting user is identified in the report’s body and subject line (3| Suspected Phishing Email - <user email> - <timestamp>). If your security team specifically needs user-email attribution at the SMTP envelope level, v2 sends reports from the user’s address.
The button isn’t showing up for users. What do I check?
- It can take up to 24 hours after deployment for Microsoft to propagate the add-in to users. If you just uploaded the manifest, wait.
- Confirm the manifest was actually deployed to those users in Microsoft 365 admin center. Manifests can be scoped to specific users or groups — if a user isn’t in scope, they won’t see it.
- For v3, confirm the user’s Outlook client version is in the supported list above. If they’re on classic Outlook on Windows, they need build 17530.15000 or later. Older versions need v2.
- Have them restart Outlook — new add-ins don’t always appear until the client restarts.
How do reports integrate with Microsoft Defender or other security tooling? Reports follow Microsoft’s standard reporting format, which lets the customer’s security tooling consume them the same way it consumes other reported-phishing items. The destination mailbox is the integration point — point Defender, Sentinel, or whatever the customer uses at that mailbox.
Related
Section titled “Related”- Phishing templates — choose which tests are eligible to send.
- Tailor to your client — RPB is one of the recommended Tailor steps after onboarding.